Author

Farmers Entrance

Browsing

1. Chick source: Don’t compromise on good chicks

2. Feed: let your priority be on quality feed most especially on the first two weeks.

3. Heat during brooding: the average heat needed for brooding is 35°c, the temperature should be adjusted according to birds reaction.

READ ALSO: Perfect Temperature for Brooding Chicks

4. Water: don’t give your birds the water you cannot drink.

READ ALSO: Water Management in Poultry Production

5. Vaccination and medication: vaccine is for prevention of disease, drugs is for curing disease.

READ ALSO: Vaccine Failure in Poultry

6. Bedding/litters management: protect your litters from getting wet, change it when it’s dirty.

Read ALSO: LITTER MANAGEMENT IN POULTRY FARMING (1)

7. Biosecurity: your pen is not a restaurant, don’t allow everybody to enter.

8.Record keeping: 80% of small scale farmers don’t keep record, this made them to sell below the production cost.

The important data that is important in your record book are

a. Weight of birds at day old, and least every two weeks.

b. Feed intake

c. Medication and vaccination given

d. Mortality

Water taken for each day is also important, it helps in know how to dilute your drugs and vaccine


Click HERE to join our farmers whatsapp group for more information on poultry and livestock production. 

Water management is a crucial part of broiler health & profitable poultry production.

Generally, poultry consumes more water (1.5 to 2 times) than feed. As a result, water is the most critical nutrient for poultry.

And also the expenses we made on drugs can be greatly reduced if we give more attention the following tips on water management.

1. Always give them clean water and make sure you change their water in the afternoon (don’t serve your birds the water you cannot drink)

2. Don’t allow vaccinated water to stay more than 0ne hour with them.

3. Don’t allow medicated water(water mixed with antibiotics or multivitamin) to stay more than six hours with them, medicated water start producing odour after long hours.

Only put medication in the water they will finish within six hours.

Click HERE to join our WhatsApp group

4. Make sure you serve water before serving feed in case your drinker system is not automated.

READ ALSO: Best Ways to Avoid Mortality in Brooding

5. Wash your tank and your water pipes occasionally to prevent bacteria buildup in your water tank and pipes.

6. Don’t use chlorinated water to dillute their vaccine, it will damage the vaccine.

7. Adding milk the water you intend to dilute your vaccine with will helps to stabilize the water and neutralize the Chlorine/others foreign materials that might have prevent the effectiveness of the vaccine

8. Do well to damage your left over vaccine by mixing chlorine with it before disposing it.

READ ALSO: Vaccine Failure in Poultry

9. Do occasional bacteria load test on your water at a reputable lab to be sure you are not giving your bird contaminated water

Click HERE to join our WhatsApp group

One of the many important factors that determine the success of brooding day old chicks is heat.

It is advisable for farmers to buy a thermometer to monitor the temperature of the brooding house.

The perfect temperature for brooding day old chicks is between 35°c and 37°c.

Temperature higher or lower than this can cause mortality and high temperature can affect calcium absorption in chicks.

READ ALSO: Guides to Successfully Chicks Brooding

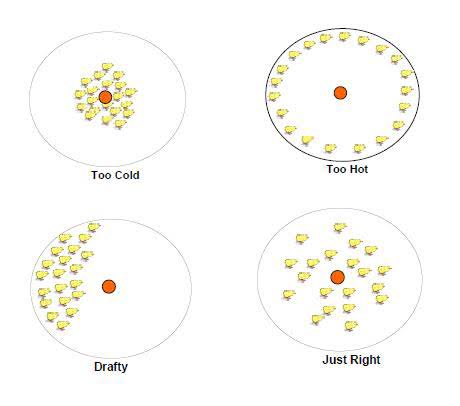
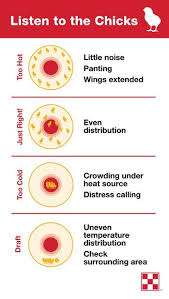
However, farmers without thermometer can determine the heat effect on the birds by how distributed they are in the brooding pen.

Below are different diagram that perfectly illustrate the behavior of chicks in response to the temperature of the pen.


Click HERE to join our WhatsApp group


If a farmer can get the first two weeks of raising birds right, then  farming business will be enjoyable.

Brooding broiler chicks involves providing the optimal environment and care to ensure their health and growth from day-old to four weeks. Here’s a detailed guide on the essentials of brooding:

 1. Preparation of the Brooder House

Cleaning and Dïsinfëçtion: Thoroughly clean and disinfect the brooder house a week before the chicks arrive. Remove any old litter, wash down the surfaces with a pressure washer, and apply a disïnfëctânt effective against common poultry disëáses like Vïrkøn S or a blëâch sølütion. Allow the house to dry completely before adding new litter.

Litter Preparation: Spread a 2-3 inch layer of absorbent litter material (such as wood shavings, rice hulls, chopped straw, or newspaper) on the floor. The litter should be dry, free from mold, and dust-free to provide a comfortable bedding for the chicks and absorb moisture.

Heating Source: Install heating equipment like infrared heat lamps, gas brooders, or electric heat plates. Position the heat source to provide an even distribution of warmth. Maintain a temperature of 32-35°C (90-95°F) at chick level for the first week. Use a thermometer to check the temperature in multiple locations within the brooder.

Make sure you hear up your brooding pen at least one hour before the chicks arrival.

READ ALSO: How to Sustain a Disease Free Poultry Farm

 2. Setting Up the Brooder

• Temperature Regulation: Monitor the temperature closely. Place thermometers at chick level in different parts of the brooder. Reduce the temperature by 2-3°C each week until it reaches 21°C (70°F) by the end of the fourth week. Ensure the chicks have a warm area and cooler areas to move to if they get too hot.

Brooder Guard: Set up a circular brooder guard (18-24 inches high) to prevent chicks from straying too far from the heat source. This also helps prevent crowding and sufføcátion. The guard should have a diameter of about 5-6 feet for 50 chicks. As the chicks grow, expand the brøøder guard to give them more space.

READ ALSO: How To Treat Lice and Mites in Chickens

 3. Receiving the Chicks

Immediate Placement: Upon arrival, quickly and gently place the chicks under the heat source. Ensure they are spread out evenly to avoid crowding. Allow them to settle in for at least an hour before introducing food and water. During this time, monitor their behavior to ensure they are comfortable.

Water Provision: Provide clean, fresh water immediately. Use shallow drinkers to prevent drowning. Add electrølytës and vitämïns to the water, such as a commercial electrølytë solution, to combat stress from transportation. Ensure the water is at room temperature to encourage drinking.

Feeding: Start with a high-quality chick starter feed that contains 20-22% protein. Spread some feed on paper sheets or chick paper to encourage pecking and eating. Use shallow feeders to make it easy for the chicks to access the feed. Gradually introduce them to the regular feeders over a few days.

READ ALSO: Poultry Diseases That Affect Humans

 4. Daily Care and Monitoring

• Check Temperature: Observe chick behavior to adjust temperature. Chicks huddling under the heat source indicate they are cold, while those far from it indicate they are too hot. Chicks evenly spread out and actively moving around show the temperature is just right.

Water and Feed Management: Clean and refill waterers and feeders daily. Ensure feed is always available but prevent wastage by not overfilling the feeders. Check for wet litter around waterers and clean immediately to prevent mold and báctérial growth.

Health Checks: Look for sigñs of illness like léthárgy, ruffled feathers, or pästy vënts (a condition where droppings stick to the chick’s vent area). Isolate and tréät any sïck chicks promptly. Consult a véterinärian if necessary for a proper diágnøsis and tréâtmént plan.

Ventilation: Ensure adequate ventilation without creating drafts. Proper airflow helps maintain air quality and prevents rëspirátory issüēs. Use fans or open windows, but make sure there are no direct drafts on the chicks.

READ ALSO: Sudden Death Syndrome in Broiler

5. Lighting

• First Week: Provide 24-hour light to encourage eating and drinking. Use bright, white light to mimic daylight. Position the lights evenly to avoid dark spots in the brooder.

Gradual Reduction: Gradually reduce light hours to 18-20 hours by the end of the fourth week. Dimming the lights slightly at night can help establish a natural day-night cycle.

READ ALSO:

 6. Space Requirements

First Week: Provide 0.5 square feet per chick to give them enough room to move around and avoid overcrowding.

Gradual Increase: Increase space to 1 square foot per chick by the end of the fourth week. As the chicks grow, expand the brooder area to ensure they have enough space to develop properly.

READ ALSO: THE 14 SECRET OF PROFITABLE FISH FARMING(must read for every fish farmers)

 7. Equipment and Hygiene

• Feeding and Drinking Equipment: Ensure all equipment is clean and functional. Dîsïnfëct feeders and drinkers weekly with a suitable disïnfëctânt. Rinse thoroughly before refilling.

Hand Hygiene: Practice good hygiene by washing hands before and after handling chicks. Use hand sanitizer if soap and water are not available to reduce the risk of dīsëäse transmission.

READ ALSO: Vaccine Failure in Poultry

 8. Record Keeping

• Daily Logs: Maintain records of temperature, mørtälity, feed and water consumption, and any héälth issüēs. Regularly reviewing these logs helps identify trends and potential problems early.

• Growth Tracking: Weigh a sample of chicks weekly to monitor growth rates. Compare their weights to standard growth charts to ensure they are developing properly.

READ ALSO: Best way to change from one feed to another

 9. Handling Stress

• Minimize Handling: Handle chicks as little as possible, especially during the first few days to reduce stress. When handling is necessary, be gentle and calm.

Reduce Noise: Keep the brooder environment quiet to reduce stress. Avoid loud noises and sudden movements around the chicks.


By following these detailed steps, you can ensure a successful brooding period for your broiler chicks, leading to healthy growth and development.

Connect with other farmers and get yourself updated by clicking Here to join our WhatsApp group


Vaccines work by introducing a small, harmless piece of a disease-causing agent (antigen) to the body, which triggers the immune system to produce antibodies and immune cells that can recognize and fight the disease.

Here are various possible outcomes of vaccinating birds:

Positive Outcomes:

– Immunity to specific diseases

– Reduced disease transmission

– Improved bird health and well-being

– Increased productivity and egg production

– Enhanced immune system response

– Reduced antibiotic use

– Protection against zoonotic diseases

READ ALSO: Vaccine Failure in Poultry

Negative Outcomes:

– Adverse reactions (allergic reactions)

– Vaccine failure or ineffectiveness (most times due to temperature fluctuations during storage, which is common in areas with poor power supply/lack of back-up power supply).

– Stress and discomfort during vaccination

– Vaccine contamination or improper handling

– Vaccine-induced immunosuppression

– Interaction with other health issues or medications

– Cost and logistical challenges

READ ALSO:Antibiotic Resistance in Poultry (Cause and Prevention)

Neutral Outcomes:

– No noticeable effect on bird health or productivity

– No change in disease susceptibility or transmission

– No adverse reactions or interactions

Rare Outcomes:

– Vaccine-associated diseases (e.g., Marek’s disease)

– Autoimmune disorders

– Tumors or cacance

It’s crucial to consult with a veterinarian to determine the best vaccination program for your specific flock and monitor for any outcomes.

READ ALSO: Nutritional Deficiency in Poultry

What are vaccines made from:

– Weakened or killed forms of the disease-causing agent

– Genetic material (DNA or RNA)

– Subunits of the disease-causing agent, such as proteins or sugars

– Inactivated toxins

By stimulating the immune system, vaccines help protect against infectious diseases, reducing the risk of illness, complications, and transmission.

Connect with other farmers and get yourself updated by clicking Here to join our WhatsApp group
 

Grain overload is also known as acidosis or grain poisoning, it occurs when cattle, sheep or goats eat large amounts of grain. The grain releases carbohydrate into the animal’s rumen and this rapidly ferments rather than being digested normally. Bacteria in the rumen produce lactic acid, resulting in acidosis, slowing of the gut, dehydration and often death.

Other Names

  • Acidosis
  • Carbohydrate Engorgement
  • Carbohydrate Overload
  • Grain Overload
  • Lactic Acidosi

What causes grain overload?
Wheat and barley are the most common causes of grain overload, but it occasionally occurs with oats and lupins. Crushing or cracking of grain by a hammermill increases the likelihood of grain overload, because these processes result in quicker release of carbohydrates.

Cases are often seen when:

stock are suddenly grain fed without being gradually introduced to the grain or pellets
there is a sudden change in feeding regimen or in the grains being fed
stock graze newly harvested paddocks (where there may be spilled grain or unharvested areas)
stock get unplanned access to grain or pellets, such as around silos.
Which classes of stock are affected?
Cattle sheep and goats of any age can be affected if they eat more grain than they can digest normally

Signs of grain overload:

  • Depressed appearance
  • Lying down
  • Diarrhoea
  • Dehydration and thirst
  • Bloat (of the left side of the abdomen)
  • Staggery or tender gait and ‘sawhorse’ stance
    deaths.

Treatment
Consult a veterinarian for a treatment plan, as treatment will vary according to the severity of the disease. Treatments include

intravenous fluids

Drenching with bicarbonate solution or milk of magnesia

Intraruminal antibiotic injections

Thiamine or steroid injections

Surgery for very valuable animals.

Following grain overload, the rumen lining takes up to six weeks to repair, so recovering animals will show poor growth rates during this time.

Some animals may develop secondary infections, including abscesses in the liver and other organs. These animals tend to become long-term poor doers and may need to be culled.

Welfare
Animals that appear very depressed after getting sudden access to bulk grain, and which are not immediately treated, will usually die. It is advisable to discuss individual animals affected like this with your private veterinarian.

Prevention

Grain overload can be prevented by gradually introducing animals to grain or pellets. The amount of grain and the time taken to adapt sheep or cattle to grain depends on:

  • Availability of hay and other feed
  • Time of year
  • Type of grain being fed
    aims of feeding (such as for weaners for sale or for lactating ewes).
  • Specific antibiotic products that selectively reduce the numbers of acid-producing bacteria in the gut are available on prescription from veterinarians. These make it safe to introduce grain more rapidly without a long conditioning process.

Some useful guidelines for preventing grain overload in stock are:

Use oats and lupins in preference to, or before transitioning to, wheat or barley.
During the introduction phase, feed grain daily.
Introduce oats to sheep by starting with 50 grams on the first day, followed by increases of 50g per head per day until the required ration is reached.
Ensure sheep always have access to roughage as well as fed grain.
Introduce oats to cattle by starting with 500g per head per day, followed by increases of 500g per head every fourth day until the required ration is reached.
When feeding grain to cattle for production ensure a good quality source of hay or silage is always available and that it makes up at least 20% of the ration (unless feeding a complete ration where the roughage and grain are mixed).
To transition to wheat or barley from oats, increase the wheat or barley portion by 25% of the oat ration every five days over 16 days. For example, if the current oat ration is 500g, start by adding 125g of wheat or barley to every 375g of oats.
Monitor your herd or flock for signs of scouring, depression, lethargy and lameness, which will indicate that the amount of grain being fed is being increased too fast.
Check pulpy kidney vaccinations are up to date and vaccinate if necessary before grain feeding.

Diseases with signs that may resemble grain poisoning:

  • Polioencephalomalacia
  • Salmonellosis
  • Pulpy kidney (enterotoxaemia)
  • Pregnancy toxaemia
  • Hypocalcaemia
  • Lupinosis

If you are in doubt about the signs your stock are displaying or you see unusual disease signs or multiple deaths in your stock, call your veterinarian.

Connect with other farmers and get yourself updated by clicking Here to join our WhatsApp group
 

Antibiotic resistance is when bacteria change to resist antibiotics that used to effectively treat them. This makes certain bacterial infections difficult to treat.

Antibiotic resistance is a type of antimicrobial resistance. Fungi, parasites and viruses can also develop drug resistance.

The body of the birds doesn’t develop antibiotic resistance — bacteria do. When antibiotic resistance happens, fewer antibiotics are effective against a particular bacterium. Other antibiotics often help, but it’s important to have as many treatment options available as possible. It’s also important to begin effective treatment as quickly as possible for serious infection on your farm. If it takes longer for a vet to find a medication that will treat an antibiotic-resistant infection, the outcome can be more serious.

READ ALSO: Poultry Diseases That Affect Humans

Antibiotic resistance is dangerous because it reduces treatment options for birds who are sick. It may also delay effective treatment. As a result, farmers may face:

Increased risk of severe, extended illness or death of birds
Severe medication side effects.
Increased medical costs.
Spread of disease on farm(farmers are expected to have sick bay on the farm, so sick birds can be separated from the healthy one)
What causes antibiotic resistance?
Bacteria naturally become resistant to medications over time. But certain factors can speed up the process, including:

1.Overuse of antibiotics: Giving your birds antibiotics when they don’t need them contributes to antibiotic resistance. Farmers should be careful when using antibiotics for prevention measures.

READ ALSO: How to Sustain a Disease Free Poultry Farm

2. Misuse of antibiotics: Bacteria take advantage of any opportunity to multiply. If you refuse to use appropriate dosage of antibiotic for your sick birds, or you stop treatment too soon, bacteria start reproducing. As they multiply, they can change (mutate). Mutated bacteria become increasingly resistant to medicine. Antibiotics can kill the bacteria that haven’t mutated to resist treatment, but they leave the resistant bacteria behind.

READ ALSO: AFLATOXIN IN POULTRY- Symptoms & Control

Spontaneous resistance. Sometimes, the genetic makeup (DNA) of a bacterium changes or mutates on its own. The antibiotic doesn’t recognize this newly changed bacterium and can’t target it the way it should. Or , the change helps the bacteria fight off the medicine’s effects.

READ ALSO: 11 Foods That Are Dangerous to Rabbit (must read for all rabbit owners)

When birds get sick, one of the first things you might wonder is what kind of medicine can you give to make them feel better. Thankfully, antibiotics are still powerful tools in the fight against many bacterial infections. They’ll improve their symptoms and lower the risk of serious complications. But as time goes on, more bacteria are developing resistance to medicines that have worked for years. This situation can be scary, but learning more about antibiotic resistance can help you on how to use antibiotics properly. Talk to your vet  about ways to make your birds stay healthy.


Connect with other farmers and get yourself updated by clicking Here to join our WhatsApp group
The size of eggs is very important to poultry farmers because the larger an egg, the higher its market value and consumer appeal. There are six types of eggs, according to the general classification or nomenclature:

  • Jumbo Eggs: weighs 70 g and above
  • Extra Large Eggs: weighs between 63 g and 70 g per unit
  • Large type Eggs: weighs between 56 g and 63 g per unit
  • Medium Eggs: weighs between 49 g and 56 g per unit
  • Small Eggs: weighs between 42 g and 49 g per unit
  • Peewee Eggs: weighs below 42 g per unit.

READ ALSO: PROLAPSE IN LAYERS – PREVENTION AND TREATMENT

Factors that Influence Egg Size

If you want to control the size of your eggs, you must first understand the various factors that influence egg size. To achieve your goal, you should also take the appropriate measures based on these factors.

1. Breed
Some smaller breeds produce small eggs due to their body size, while some chicken breeds produce medium to large eggs. Individual hens may not lay an egg that consistently falls within the breed’s average egg size. Geneticists work to create commercial lines that have different size ranges and egg weight is a heritable trait that responds to genetic selection. It is important to select a commercial variety of bird that produces the size of egg you want to produce. However, about 60% of egg size variation is due to non-genetic factors such as nutrition and management.

2. Ambient Temperature
The ambient temperature of a house has a substantial impact on the size of eggs produced. The eggs produced in hot conditions are often small. Feed consumption declines if the temperature is too hot, therefore hens lay smaller eggs. When the temperature of the house exceeds 27 degrees Celsius (over 80 degrees Fahrenheit) the eggs are smaller.

READ ALSO: How to Identify Good Laying Birds

3. Lighting Programs
Chickens are responsive to changes in day length. Egg size is influenced by lighting programs in the growing period. Lighting programs can delay or accelerate sexual maturity in pullets. The age in which a chicken starts laying has a significant influence on the egg size. Light stimulation should be done based on the flock’s body weight and uniformity. Later light stimulation and heavier body weights will delay maturity and increase egg size. Standard lighting period of 17 is perfect for layers.

4. Age of hen
The eggs are smaller when the laying hens are young, and they gradually grow larger as the laying hens get older. Old layers’ eggs (around 1 – 2 years) are frequently large and can weigh more than 70 grams. Birds aged 20 to 26 weeks lay smaller eggs than those aged 40 to 50 weeks. When the birds are about a year old, they will have reached their maximum egg size. Just before birds stop laying, egg size tends to decrease.

5. Feed intake
If all required nutrients are available in correct quantities in the feed, then the higher the feed intake, the larger the eggs. This is simply because eggs are also derived from feed through digestion, absorption, and metabolism. Any factors that may inhibit feed consumption, such as crowding or stress, will reduce egg size. Environmental temperatures above a bird’s thermoneutral zone (>33 degrees Celsius) have a dampening effect on a bird’s feed intake

READ ALSO: Best way to change from one feed to another

6. Water consumption

If a hen does not consume adequate water, it affects the egg size and production. The water quality and temperature are also important. Lower water consumption will mean a reduction in feed consumption too, resulting in smaller eggs.

7. Body weight and skeletal size
Chickens with higher body weights lay larger eggs, and chickens with smaller body weights produce smaller eggs. Body weight is dependent on a variety of nutrients, light and feed intake. Heavier hens also tend to lay more eggs throughout the production period. Body weight can be affected by many factors including transfer, disease, beak trimming, vaccination, lighting programs, space and nutrition. It is important to reach target body weight with good uniformity before starting light stimulation and achieving sexual maturity

8. Nutrition
Proper nutrition in the rearing period allows the hen to achieve or exceed standard body weights. During the laying period, diet specifications can be used to manage egg size. Energy, methionine/cystine, other digestible amino acids, linoleic acid and total fat can directly affect the egg size and when supplied correctly, help product larger eggs. If mineral requirements are not met and birds are laying too large eggs, this could result in thinner shells and more cracked eggs. Protein is an essential component of the diet that also needs correctly balanced. Eggs are a high protein food therefore birds also need a good amount of protein in their diet.

ALSO READ: AFLATOXIN IN POULTRY- Symptoms & Control

9. Bird Health
Disease, stress, injury, and fear can affect the feed intake of chickens and egg production rate. Prevention of disease is important part of production. Good hygiene, biosecurity practices and management will reduce the risk of infection. Prevention and control of disease is not only critical for quality of eggs but also the success of the whole chicken production

READ ALSO: Vaccine Failure in Poultry

10. Egg Cooling and Storage
It is important to cool eggs as quickly as possible after they are laid and to store them well at a temperature of 50oF to 55oF. If eggs are not stored correctly then they will lose weight by evaporation which may result in poorer grading results and therefore a poor economic return.

Connect with other farmers and get yourself updated by clicking Here to join our WhatsApp group


Sudden death syndrome  is also called flip over, it occurs mostly in broiler chickens. The cause is uncertain, but it may be a metabolic disorder due to over eating that predisposes birds to cardiac arrest. Affected birds die suddenly and have no specific gross lesions. 

It can be induced by lactic acidosis and about 70% of birds affected are males.

Signs

  • Sudden death in convulsion, most are found lying on their back.
  • Intestine filled with feed.
  • Haemorrhages in muscles and kidneys.
  • The atria of the heart have blood, the ventricles are empty.
  • Serum accumulation in lung (may be little if examined shortly after death).
  • Livers heavier than those of pen-mates (as a percentage of bodyweight).

READ ALSO: Poultry Diseases That Affect Humans

Diagnosis

Birds found on back with lack of other pathology.

Treatment

No treatment

READ ALSO: Danger of Early Iron Injection in Piglet

Prevention

Lowering carbohydrate intake (change to mash), feed restriction, lighting programmes, low intensity light, use of dawn to dusk simulation and avoidance of disturbance.

A higher incidence has been noted in flocks fed wheat-based diets compared with those on maize diets.

Connect to other farmers and get yourself updated by clicking Here to join our WhatsApp group

The cheapest and most-effective method of disease control is through implementing biosecurity.

Biosecurity ensures that the health and well being of your birds are protected hence improving the immunity and performance of your flock.

Biosecurity is a management practice designed to prevent entry of diseases into a farm, and limit spread. It is an essential element to a good animal husbandry process.

It is important that every poultry farmer checks if their biosecurity plans are strong enough to keep out diseases.

Infectious diseases are introduced on farms through:

1.Introducing diseased or carrier birds. (from infected parent stock, buying old birds from other farmers etc)

2.Visitors, suppliers, vets and farmers clothing, shoes and vehicles.

A VET WHO NEVER FOLLOWS BIOSECURITY GUIDELINES IS A VECTOR.

3.Poor disposal of dead birds’ carcasses, Feathers and litter

4.Contaminated drinking water provided to the birds. Contamination at the water source, in the reservoir tank or in the water pipes.

5.Rodents and wild birds. Rats move farm to farm, mites biting different birds, cats moving house to house. At one farm, a monkey fell into an open water tank, died from there and was realised when hair from its skin were seen blocking nipples !!

6.Egg transmission: setting contaminated eggs with clean eggs in one hatchery!!, diseases that are from the parent stock, etc

7.Contaminated feeds and feeding equipment.

8.Farmer’s ornamental birds and pets: keeping pigeons, geese, etc on a commercial farm of exotic birds is not allowed.

9.Airborne infections: these diseases that cause flu, cough, can be transmitted through the wind.

For an effective biosecurity plan, there are three aspects that should be considered:

A.Isolation,

B.Human traffic control and

C.Sanitation.

READ ALSO: Best ways to manage odours in your poultry farm

ISOLATION

This is done through confining the birds in a controlled environment and keeping all other animals out. This is achieved through:

• Construction of fences, putting a gate: to control traffic in and out of the farm

• Practicing all-in-all-out poultry management. Keeping birds of different age groups in one house is highly risky.

If you have to introduce any bird or birds into the farm, ensure that there is an isolation unit as far as possible from the resident birds:

These new birds should be isolated for 2-4 weeks; during this period the birds will be observed for signs of diseases and treated if any is seen, and should be vaccinated before introducing them nearer to the flocks at the farm.

A vet carrying out farm visits should not visit any other farm after visiting a sick farm!

When a vet visits, he should start with the youngest flock at the farm.

Farmers should handle the new birds last after all the others. Ensure you obtain new birds from a reliable source.

Keeping rodents and wild birds away: Rodents spread diseases into the farm through their droppings or secretions.

They are kept out through placing wire nets and avoiding spillage of feeds outside the poultry house. Also ensure there are no dams near the poultry house as this attracts water birds.

FREE FROM STRESS

Clear the surroundings of bushes and shrubs as these provide hiding areas for rodents , mosquitoes and other wild animals.

READ ALSO: Danger of Early Iron Injection in Piglet

HUMAN TRAFFIC CONTROL

Humans are the biggest threat to spread of diseases. Humans transfer diseases through their clothing, shoes, hands, equipment and vehicles. Every farmer should control the number of people that come into the farm. Control movements of poultrymen out of the farm.

READ ALSO: 5 Natural Growth Booster for your Broiler

SANITATION

The poultry house should be kept clean to ensure that there is no spread of diseases. Chicken litter should be dry at all times as wet and dirty litter predisposes the birds to coccidiosis among other infections.

Visitors should have their cars disinfected and their shoes too at the entrance to the farm. Everyone should wash their hands with a disinfectant and wear protective clothing – a dust coat and gumboots before they enter into the poultry house.

There should be a foot-bath at the entrance of every poultry house that all visitors should dip their foot wear. With the emphasis on this foot bath, i have found out many of you here do not regularly change the disinfectant in the foot bath, and putting.

The other important way to prevent entry of diseases into the farms is through vaccinations. Vaccines aid in providing your birds with a strong immune system that is able to resist infections.

1.Never vaccinate sick birds;

Vaccines are only meant for prevention and not treatment. And every time after vaccination, give vitastress to the birds to keep them stress free, and highly productive.

2.Always keep records as this is an essential tool in ensuring good bio-security measures have been attained.

3.It is also important to note that healthy birds that are free from stress will develop an active immune system that protects them from diseases.

Multivitamins protects these birds against stress ( like stress from vaccination, debeaking, transportation, weather changes, change of feed, deworming, etc).

Stress free birds are those that are not kept in crowded environments, are fed on a balanced diet with clean drinking water, are free from fear and anxiety.

Connect to other farmers and get yourself updated by clicking Here to join our WhatsApp group